<< Previous Page :: Next Page >>

on Friday, August, 27 2010 @ 11:45:40 am (485 words)
In Uncategorized [ 218620 views ]

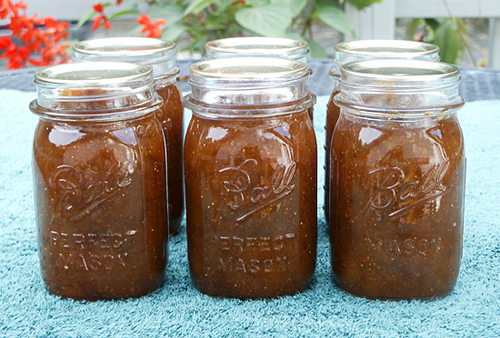
Fresh homemade fig preserves - yummy!

This time it is fig preserves; they are quite easy to make. I am lucky, I have a fig bush in the back garden so obtaining the figs was easy and the price was right, free. Slice off the stems if any and slice the figs into appropriate size slices. For the smaller figs you may be able to just quarter them; however, for the larger figs I had, I had to slice them a bit more than quarters so the pieces weren't too large. I then added sugar in a ratio of 3:4 sugar to figs. I have seen recipes that call for a ratio of 1:2 to a ratio of 1:1. Changing the ratio will affect the sweetness and one has to be careful they don't create sugar crystals in the gel which will end up as hard lumps. Figs don't require one to add any pectin to the mix as they will gel quite nicely with the pectin contained in the fruit.

I poured the sugar over the figs and then place the mixture in the refrigerator for a day; the sugar will draw the juice from the figs. Cook the mixture of sugar and figs slowly for about three to four hours, the time is dependent on the quantity and I think I cooked them for at least five. Near the end you have to be very careful or the figs will stick to the bottom of the pot and the entire batch of preserves will be ruined; the entire batch will smell and taste burnt. You want to cook them slowly, trying to speed up the process will result in burnt preserves. You basically have to watch the pot and stir it very often. You want to bring the temperature up on the mixture and stir it as the juice stars to gel. The amount of time will depend on how much you are cooking; it is a bit of an art to learning when they are ready to bottle. If you overcook them, you may end up with a preserve so thick you can not remove them from the jar.

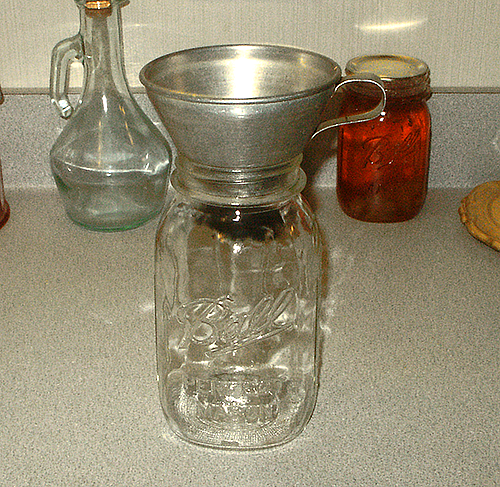
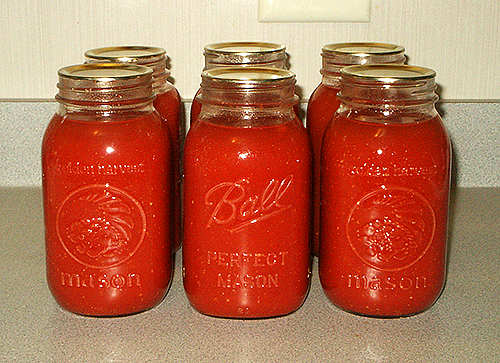
To store for future use, I recommend purchasing glass Kilner jars. Wash the jars in hot water with a liberal amount of washing-up liquid. Then sterilise the jars in boiling water for several minutes to make sure you kill any little microbes that could cause spoilage. Carefully pour the preserves into the hot jars using a wide metal funnel that has also been sterilised in the boiling water. Leave a space at the top of the jar. While you are filling the jar, sterilise one of the sealing lids in the boiling water; place the lid on top and then screw the band down snug, but don?t over tighten. Allow the jars to cool, check to make sure each lid sealed properly and then remove the bands.


on Sunday, August, 15 2010 @ 10:34:24 pm (800 words)
In Uncategorized [ 24756 views ]

This has been a lazy weekend for me. However, I decided today that I needed to tend to the task of making tomato juice. I knew with the recent rains the ripe tomatoes would not last long before they started to rot. I went into the back veggie garden and gathered all the ripe tomatoes; there were plenty that had started to rot and I discarded them.

Mum use to make her tomato juice by peeling the tomatoes and removing the core. She would then dice up the tomatoes and put them on to cook. One day her friend from next door happened to visit while she was preparing the tomatoes. When she saw Mum peeling the tomatoes, she told how she prepared her juice by puréeing the peelings into the juice; once puréed you will not know the peelings are in the juice, either for drinking or making soups. Mum tried it and from then on she just puréed the peelings into the juice and so have I.

Prestige Food Processor

One of my favourite tools for food preparation is my Prestigetm food processor. It comes with a variety of stainless steel jars and cutters. I cut off the bottom of the tomatoes, remove the core, remove the little speck on the blossom end and slice the tomatoes into the food processor. I do not bother to remove the seeds. The food processor will break up the seeds along with the peelings. Once the peelings and seeds are puréed, I pour the juice into a large stainless steel cooking pot. Do not use aluminium pots as the acid in the tomato juice will leach the aluminium into the juice; use only stainless steel or glass cookware for preparing tomato juice.

Tomato Juice On The Cooker

You need to cook the tomato juice slowly so as to not scorch the juice; if you allow any of the juice to burn on the bottom of the pot, the scorch taste will be throughout the juice. The nice thing about making tomato juice, unlike making tomato sauce or paste, is that you don't have to cook it as long. You are mainly wanting to bring the juice up to temperature to kill any bacterial that may be present; you are not trying to reduce the liquid as in making sauces.

Kilner Jar With Filling Funnel

While the juice is cooking, prepare the bottling jars by washing them in hot water with a liberal amount of washing up liquid. I wash by hand because I don't own a dishwasher; I see no sense in washing dishes to load into a machine to wash them again. The type of jars used for bottling are Kilner jars. These jars come with a lid and separate band that is used to tighten the lid in place until the lid has sealed. The band is reusable; however, the lid is not; replacement lids are easily obtainable.

Before filling the jars, you need to sterilise them in a pot of boiling water. You also need to sterilise the lid before placing it onto the rim of the jar; the bands do not need to be sterilise. To make the task of filling the jars easier, you will want to use a funnel that is designed to fit the mouth of the jar you are using; jars come in standard width mouth or wide mouth. The wide mouth jars are nice for bottling tomatoes and other vegetables that you want to preserve whole. Don't fill the jar completely to the top, you need to leave a headspace. I fill my jars to the bottom of the top section containing the screw threads for the bands. Tighten the band down snugly, but don't over tighten as you may find it difficult to remove the band later. Allow the jars to cool overnight before trying to remove the bands. You can date your jars by writing directly on the lid with a permanent marker.

The Finished Product - Fresh Tomato Juice

I do not process the jars in a pressure bottler since the tomatoes are a high acid food. However, here in the states the United States Department of Agriculture Extension Service recommends pressure processing the jars for twenty minutes at six psi. Since I cook my tomato juice for a longer period of time, and with the high acid content of the tomatoes, I have not found a need to pressure process the jars, and Mum never pressure processed her juice either. I do want to note that I am not recommending any particular way of processing tomato juice, I am simply writing about my own method of making and bottling tomato juice. If you are uncertain, I recommend that you follow the USDA Extension Services and pressure bottle your juice.


on Wednesday, August, 11 2010 @ 11:43:50 am (518 words)
In Uncategorized [ 15661 views ]

The weather this year has been a lot better than in the previous year and the green beans are doing much better this year. I have recently planted a third row and hope to have plenty to put into the freezer. I preserve my green beans by freezing them. The process is very simple and relatively quick and I thought I would share it with my readers.

Fresh Green Beans

The first step is to wash the green beans in several changes of water to make sure all the dirt and grit is removed. I grow the blue lake bush variety of green beans. This variety grows in a compact form; no runners, and the beans do not have strings which makes the preparation very easy. All one has to do is to remove the two ends from the beans and if needed break them into smaller pieces.

Green Beans Ready For Blanching

The next step is blanching the beans to destroy the enzymes that will deteriorate the quality of the green beans as they sit in storage in the freezer. The blanching process is very easy, you will need a pot for boiling water and a wire mesh basket to immerse the beans into the boiling water as shown below.

Wire Mesh Basket And Pot For Blanching

Bring the pot of water to a boil. Place your green beans into the wire basket and slowly immerse into the boiling water for three to three and half minutes. When the time is up. place the wire basket with the beans into a pot of ice water to cool the beans. Dump the cooled beans into a bowl and repeat the process for the rest of the beans.

I use polyethylene zip freezer bags; it is important to use bags labelled for freezer use as they will hold up better in the cold temperatures and help to prevent freezer burns. I carefully place the green beans in the bag, tapping the bag on the work surface at times to settle the beans. When the bag is about half full, I remove the extra air and zip the bag closed making sure the seal has properly made. I flatten the bags out and write the date on each bag so I know to use the older beans first.

Ready For The Freezer

As you can see, freezing green beans is a very easy process. I prefer this method of storing green beans to using a pressure bottler. When you are ready to eat the beans they will taste far better, almost as good as fresh green beans. Plus you can use these beans in more ways, even in a bean salad if you wish. Since the beans retain most of their firmness after the blanching process, you can thaw and julienne them as you would fresh green beans.

I have given some green beans to Sister #1 since she helped last year with fixing the fence and getting the fence charger. As long as the weather stays warm and we get plenty of rain, the green beans will continue to produce.


<< Previous Page :: Next Page >>