I was very disappoint with my beets this year. I actually sowed the seeds twice, and both times after planting heavy rains washed the seeds away. I have decided to plant the seeds in flats next year and do transplants instead of sowing directly into the ground. After the heavy rains, the weather turned to one with very hot and humid days. However, even with the short season I did manage to get enough beets to make a few pots of beet pickles.
Pickling beets is easy, although it can be a bit messy. To help keep the mess down, I spread several layers of newspapers or circulars on my work tops before starting. Since we are talking about a root crop, it is very important to wash the beets as thoroughly as possible using several changes of water. You want to make sure all of the soil and grit is removed before cooking. When washing the beets, avoid breaking the roots off as much as possible. Once the beets are clean, you want to cut the tops off leaving about 5 cm (2 in) of the tops in place. Do not cut the tops off at the beet or remove the roots as it will cause the beets to bleed out during cooking. I remember Mum telling me about her first beet pickling experience. She removed the tops and the roots before cooking and the beets bleed out resulting in beet pickles that had little colour or taste. Mum ruined her entire beet crop. I learned from Mum and you can learn from me.
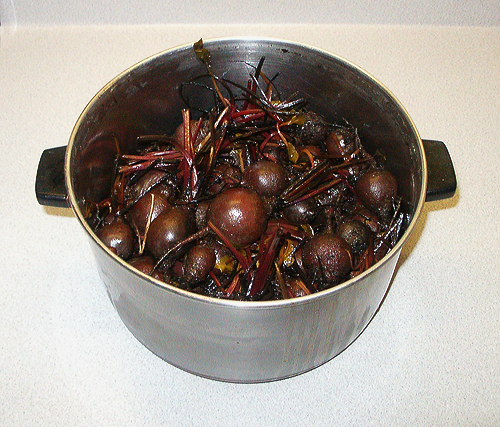 Cooked beets waiting to be peeled |
Place the beets in a large pot and fill with water until the beets are covered. It is important not to over cook the beets. For one thing, the longer you cook the beets, the more they will bleed; another is that you want the beets to retain an amount of firmness; mushy beet pickles is not a good thing. The problem with telling you how long a time to cook is that it depends on the size of the beets. If you have mostly small beets, you would not cook them as long as if you had mostly large beets. An estimate would be around twenty minutes for medium to large beets. You can take out one of the smaller beets and test it to get an idea of the readiness of the beets.
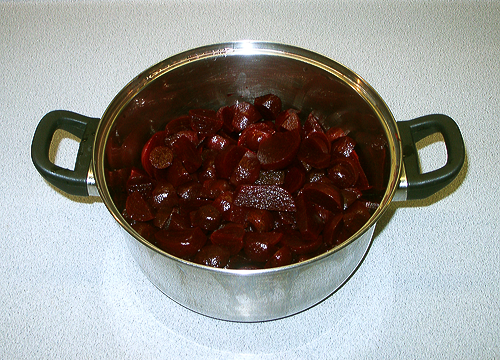 Sliced beets waiting to be pickled |
Once the beets are cooked, drain and allow to cool. You may want to wear some protective gloves when peeling the beets to avoid staining your hands. Peeling the beets is an easy job. First slice off the tops and the roots. To peel the beets, use the edge of your knife in a scrapping motion; you will find the peelings will slip easily from the beet. Once the beet is peeled, go ahead and slice it before peeling the next one. I slice my beets into wedges, but you can slice them to suit your fancy. I prefer the wedges and that was the way Mum always sliced her beets for pickling.
To pickle the beets I use apple cider vinegar, but you can use white vinegar as well. Mum always used apple cider vinegar for making pickles and I prefer it as well. I mix apple cider vinegar and white sugar in a 1:1 ratio. If you would like a less sweet beet pickle, reduce the amount of sugar. You may see other recipes that call for adding water. Never add water to commercial vinegars. Commercial vinegars have been reduced to 5% acidity before bottling and adding water will reduce this acidity. Adding water will result in an inferior product as well as increases the chance of spoilage. I repeat, never add water to commercial vinegars when pickling.
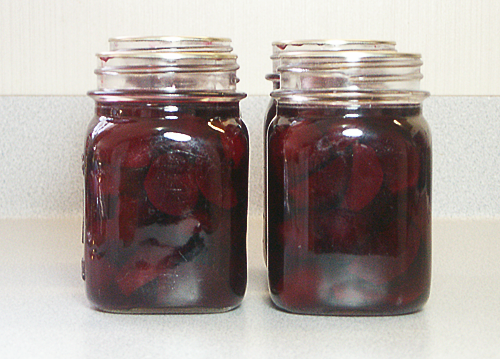 Four pots of home-made beet pickles |
In a sauce pan mix the vinegar and sugar. allowing the sugar to dissolve, and bring to a boil. While the vinegar is coming to a boil, sterilise a jar and fill with your sliced beets; don't fill completely as you need to leave some room from the rim of the jar. When the vinegar and sugar mixture has come to a boil, fill the jar with vinegar. Tap the sides of the jar to release any trapped air bubbles adding more of the vinegar-sugar mixture if needed. You want to leave a head space of about 1 cm (0.5 in) Don't keep the vinegar-sugar mixture on your burner as the vinegar will boil out increasing the amount of sugar in the mixture; set the vinegar-sugar mixture aside until needed for the next jar. Place a sterilised lid on the jar and screw the band on snugly. Set the jar aside on a tea towel and continue to the next jar repeating the procedure outlined above. As the jars cool, they will seal with a 'pop'. Let the jars sit overnight before removing the bands.
I managed to get four US pints out of my meagre beet crop this year. Hopefully next year's growing season will be better.
3 comments
 Hi Secretcorners
Thanks for the beet pickle recipe.I have bookmarked it for now.
Thanks for the warning about leaving the roots and top on.
I have seen washed out looking beets too. Didn’t know why though.
Thanks.
PS: I usually put my beets into my juicer. Nothing better then Beet, Carrot,celery,strawberry,swiss chard and any other vegetable you can think of into this juice. Even my 2and a half year old grandson.
Wonders never cease.
Hi Secretcorners
Thanks for the beet pickle recipe.I have bookmarked it for now.
Thanks for the warning about leaving the roots and top on.
I have seen washed out looking beets too. Didn’t know why though.
Thanks.
PS: I usually put my beets into my juicer. Nothing better then Beet, Carrot,celery,strawberry,swiss chard and any other vegetable you can think of into this juice. Even my 2and a half year old grandson.
Wonders never cease.  Beets are very delicious fried in a little bit of olive or coconut oil. I cut off root and stems and peel; then just slice as thin or thick as you desire.
  just a note, I too have problems with getting a good stand with beets. try this, after you plant the beet seed place a plank over the row, raise it daily to see when the seeds have sprouted, when they have sprouted remove the cover. then you have a root system developed that will help hold them in place a little better. almost anything will work for the cover, just not too heavy so as not to pack the soil. Thanks for the recipe.